Photobucket Photobucket Photobucket Photobucket Photobucket Photobucket Photobucket

Friday, April 27, 2012

DownEast Home giveaway!

Have you seen the fun spring items they have at DownEast Home?
Here are a few I love:
This square wire tray.  Only $5.99 and $7.99.  Amazing price, right?
Or this 10" opaque glass vase (only $8.99!)

Let me show you what I bought:

This awesome wire bowl 
 And these succulent stems to add to my milk glass.

Are you intrigued yet?  Because I have some great news!  I have $25 to give to you to spend at DownEast Home!  Yay!


Monday, April 16, 2012

Lego Display Shelf

If you have a 9 year old boy, like I do, you have no doubt heard these words, "I can't clean them up.  They are so special.  I worked so hard on them and they will break."  And that is supposed to make the messy room with Legos all over the floor OK.


Ryan and I decided to build a display shelf for all of these treasures.


We found the plans over at Ana White and it was so easy to make!  You can click here for her instructions.


Cut list:
1 – 1×4 @ 36 3/4″
2 – 1×4 @ 3 1/2″
4 – 1×4 @ 6 1/2″
5 – 1×8 @ 8 1/2″

First step, glue and clamp one of the 3 1/2" pieces to the edge.  Drill holes right next to it.

Put the 8 1/2" piece right up tight to the small piece.  
Hint: Use wood glue on all surfaces that wood touches wood.  Three (3) sides of this piece will have glue on them.  If you don't, it will wiggle! 


Glue and clamp a 6 1/2" piece right up tight.  Drill wood screws in the back through pre-drilled holes to secure.  Ummm just so you know, Ryan does NOT pre-drill his holes.  I do.  You can choose.


Continue alternating 8 1/2" with 6 1/2" pieces, gluing and screwing.  End with a 3 1/2" piece.


This is what it will look like:

When it is all dry, you can paint it.  I chose to do the vinegar/tea method of aging wood.  

All done!  
Brandon loved his "show-off shelf" and we love the clean floor!


p.s.  To hang it, we drilled a long wood screw directly into the wall studs.  :)


Wednesday, April 11, 2012

Yummy Zucchini Boats (getting your kids to eat those veggies!)


This post is sponsored by Country Crock. I was selected for this opportunity as a member of Clever Girls Collective, and the content and opinions expressed here are all my own.


Some of my kids are veggie lovers, and some aren't.  I was thrilled when I was introduced to the Clare Cerespo Cookbook this week.  It is full of cute and whimsical vegetable loving ideas.  And when I say cute, I mean CUTE!  This book has pictures that were so fun to look at, my kids were fighting over which vegetable dish we were going to make for dinner.


I made the final decision and we made the Veggie Boats last night to go with our spaghetti.  Oh yum!  After looking at the cute photo from Clare Cerespo my 3-year-old asked if we could put them in water.  lol!

Couscous, feta cheese, country crock.  I was in love, and the kids devoured.

No plate, no fork.  Just eat.


The vegetables stuffed in these boats are sauteed in Country Crock instead of oil or butter.  It's a healthier alternative and was definitely yummy!


Are you looking for quick and simple tips and recipes to make serving veggies more fun? Download the free Clare Crespo Cookbook here for fun and whimsical recipes your family is sure to love!

Friday, April 6, 2012

Easter Egg Bread


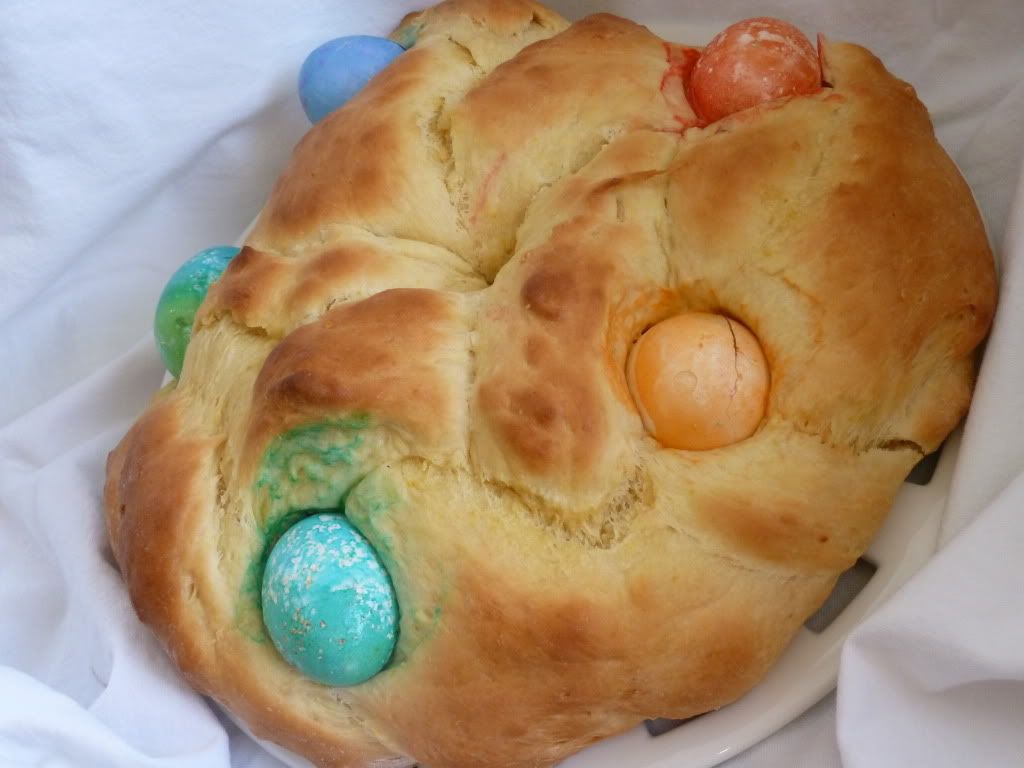
This has become a tradition in our family.  It's beautiful and delicious!

Easter Egg Bread
6 - 6 1/2 cups flour
1/2 cup sugar
2 Tablespoons yeast
1 teaspoon salt
1 1/4 cups milk
6 Tablespoons butter, softened
3 eggs, beaten
1/4 cup juice from an orange
2 Tablespoons grated orange peel
3 - 6 hard boiled eggs
vegetable oil

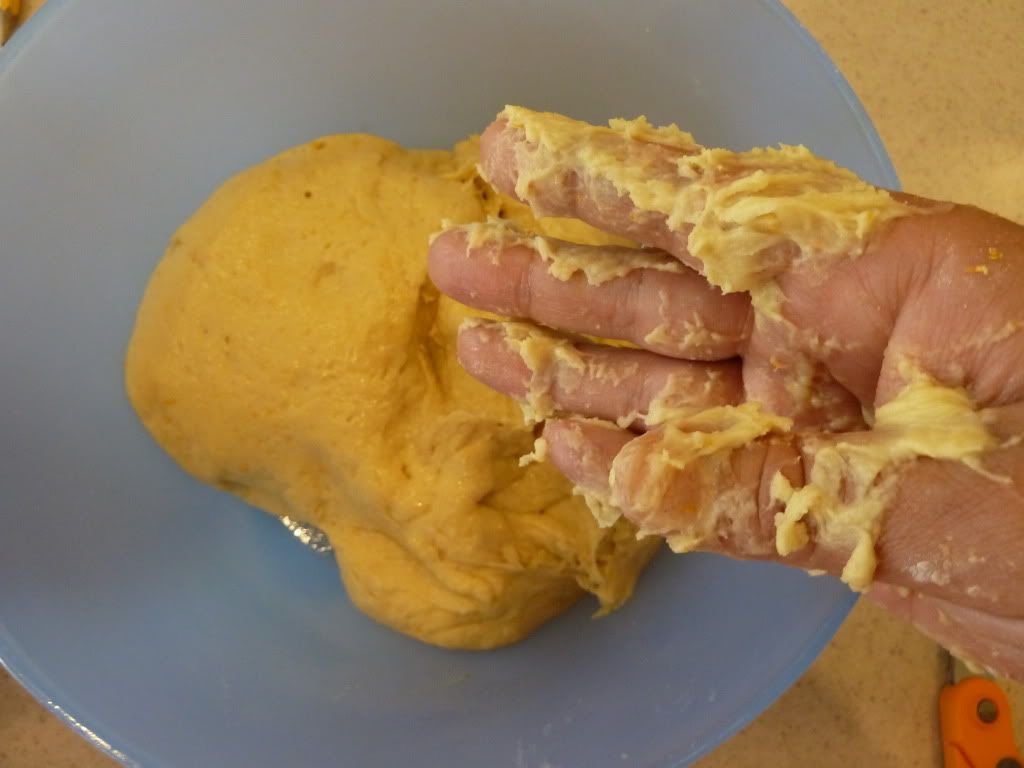
Warm up the milk in the microwave until it is HOT, but not boiling.  Mine takes about 1 1/2 minutes.  Pour into mixing bowl with butter, salt and sugar and let it cool down a little.  When it's luke warm, add yeast.  Let soften in there about 5 minutes.  Add eggs, orange peel and orange juice.  With mixer on, add flour one cup at a time until you have a soft dough.  Stop adding flour when the dough pulls away from the sides of the bowl.  It will still be a bit sticky.  Here's a shot of what my hands look like when I take it out

See?  Sticky.
Mix in your mixer for about 5 minutes.
Place in a greased bowl, turning once to grease the top.
Cover and let rise until it doubles, about 1 hour.

In the meantime, get out all those fun eggs you dyed with your kiddos.  Rub them lightly with oil.

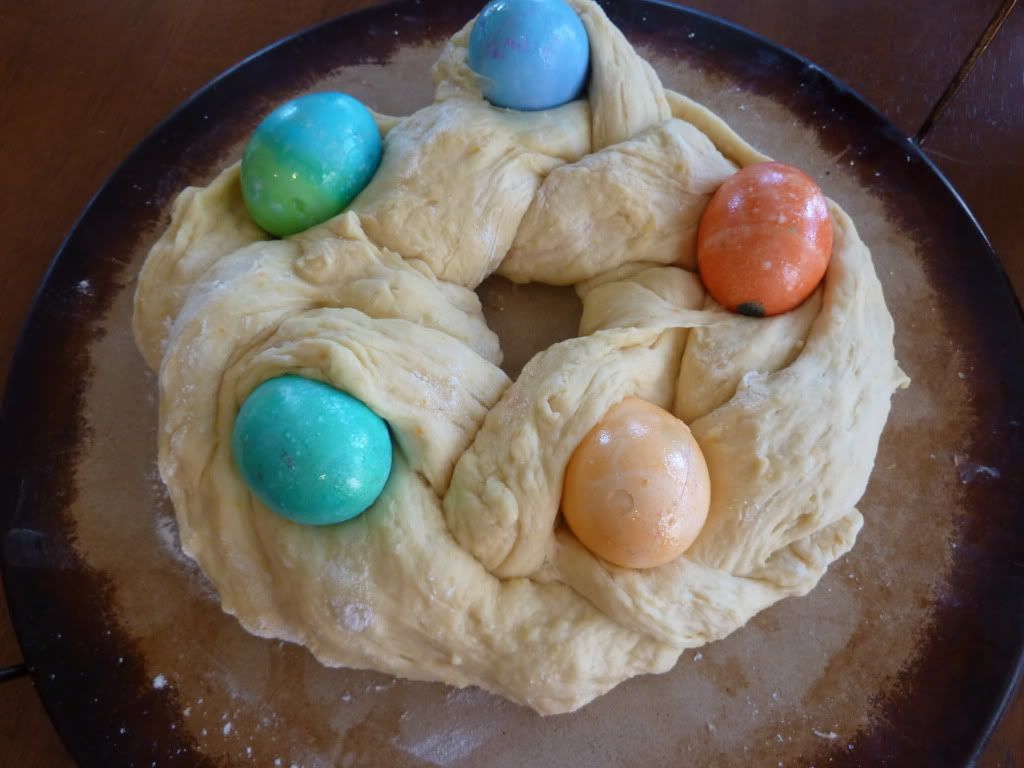
Punch dough down.  Place on a lightly floured surface.  Divide into 3 sections.  Shape each portion into a 24 inch rope. Place those ropes on a greased cookie sheet and braid together.  Bring ends together to form a ring.  Pinch ends to seal.  Gently separate the braids in a couple of places and tuck in an easter egg.  Cover with a towel and let rise for about 20 minutes.


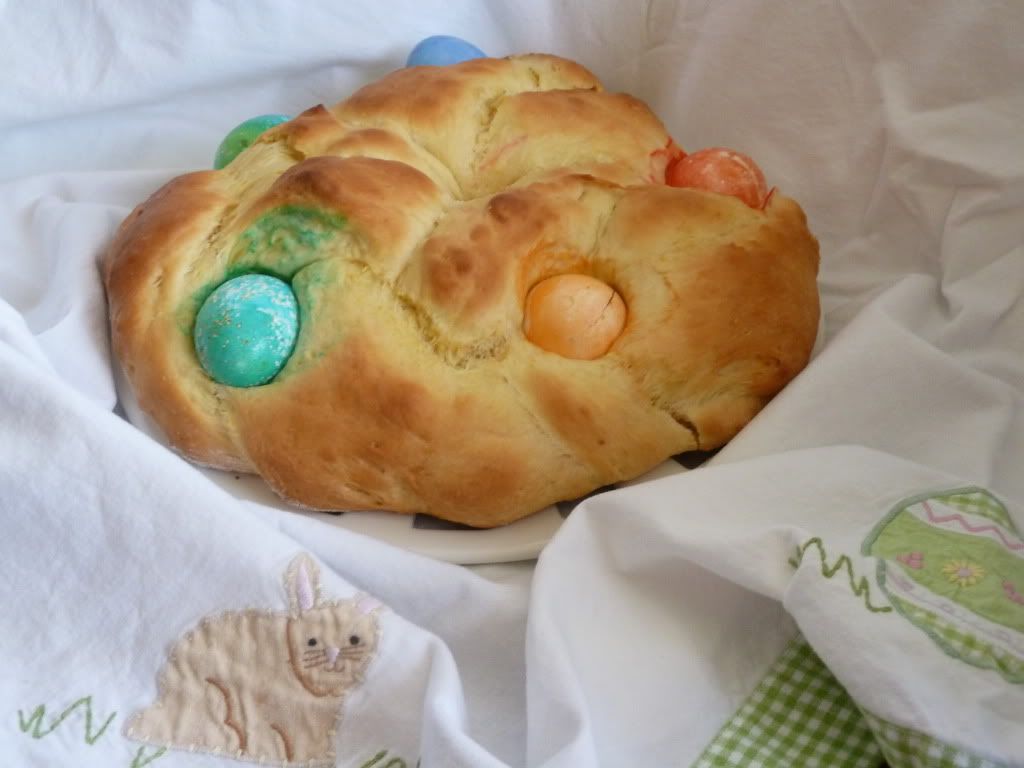
Bake at 350 for 30 minutes.  Rub a little butter on the top while it is hot to make it a little shiny.  Yum!


Thursday, April 5, 2012

For an EGG-cellent teacher!


I whipped up some cute candy jars for my kids teachers.  Literally this morning after I sent them off.  These are so fast and easy.


All I did was fill a mason jar with candy, and add some vinyl.  These said, "for my Egg-cellent teacher."  I originally got the idea from here.  I wrapped some ribbon around the top and added a bit of scrapbook paper cut into a circle on the top.

Our teachers do so much.  I feel so grateful for them!  I cannot imagine teaching over-filled classrooms every day and coming home to family.  I would go crazy!  So I try to give them a little something when I can.

Thanks teachers for all you do.  You are Egg-cellent!


linked today at: Bear rabbut bear, somewhat simple, 36th Ave, 320 Sycamore, a Little Tipsy, Someday Crafts, Lil Luna

Monday, April 2, 2012

Wardrobe Reveal!

Last year, I showed you all a beautiful wardrobe we bought for my daughters room.  I am happy to say, this weekend we finally finished it!

Here is the before....
Here is the story on this little baby.  My daughter needed a closet.  Her bedroom is technically an office = no where to hang her clothes!  I was looking at a couple of options from Ikea, and it was going to cost me around $200.  ouch!  When I found this antique on Craiglist I knew it was perfect!  It was $200!

The owners say they bought it at an antique store in California for $2500 30 years ago.  There is a date stamp on it that says 1906.  It's the coolest piece, with old fashioned hardware holding it together.  And mostly pegs and holes.  I love it!  Now before you go berserk on me thinking I totally ruined an antique, I must tell you you it was already ruined!  There were many marks and spots where it was previously painted (turquoise, mind you!) and then stripped.  Also, there was a mirror in the hole, but the previous owners broke it.

Ainsley is thrilled!  She loves bright vibrant colors and this is perfect for how she is designing her bedroom.  What do you think?

So far, linked at:  Under the table and dreaming, Keeping it simple, Skip to my Lou, Todays Creative Blog, Sassy Sites, Vintage Wannabe, Sugar Bee, Chef in Training, Home Stories A2Z, Hope Studios, Not just a housewife, mommy by day crafter by night, Lil Luna, Rae Gun Ramblings, DIY by Design, Ginger Snap, Uncommonly Yours, Blue Cricket